By Cristian Vences | September 6, 2021
Introduction

Flash BASH is a tool which automates glitching and allows for precise timing attacks. If you don’t know what glitching is, then check out our earlier blog post on the topic to learn more.
We are pleased to release an initial open source version of this tool available on GitHub. Please take a look and reach out with any feedback. Please feel free to submit pull requests or post issues on the GitHub page as well.
In this blog post we will be covering all the features of Flash BASH including a walkthrough on how to set it up so that anyone can install it and get hacking!
Revisiting Glitching
As we mentioned in our previous blogpost, glitching is the process of changing voltage levels in a system to cause disruption. If timed correctly, the system may fail open into a state which the designers did not intend. We often find that when a device is booting the system is most vulnerable to a glitching attack.
The Target
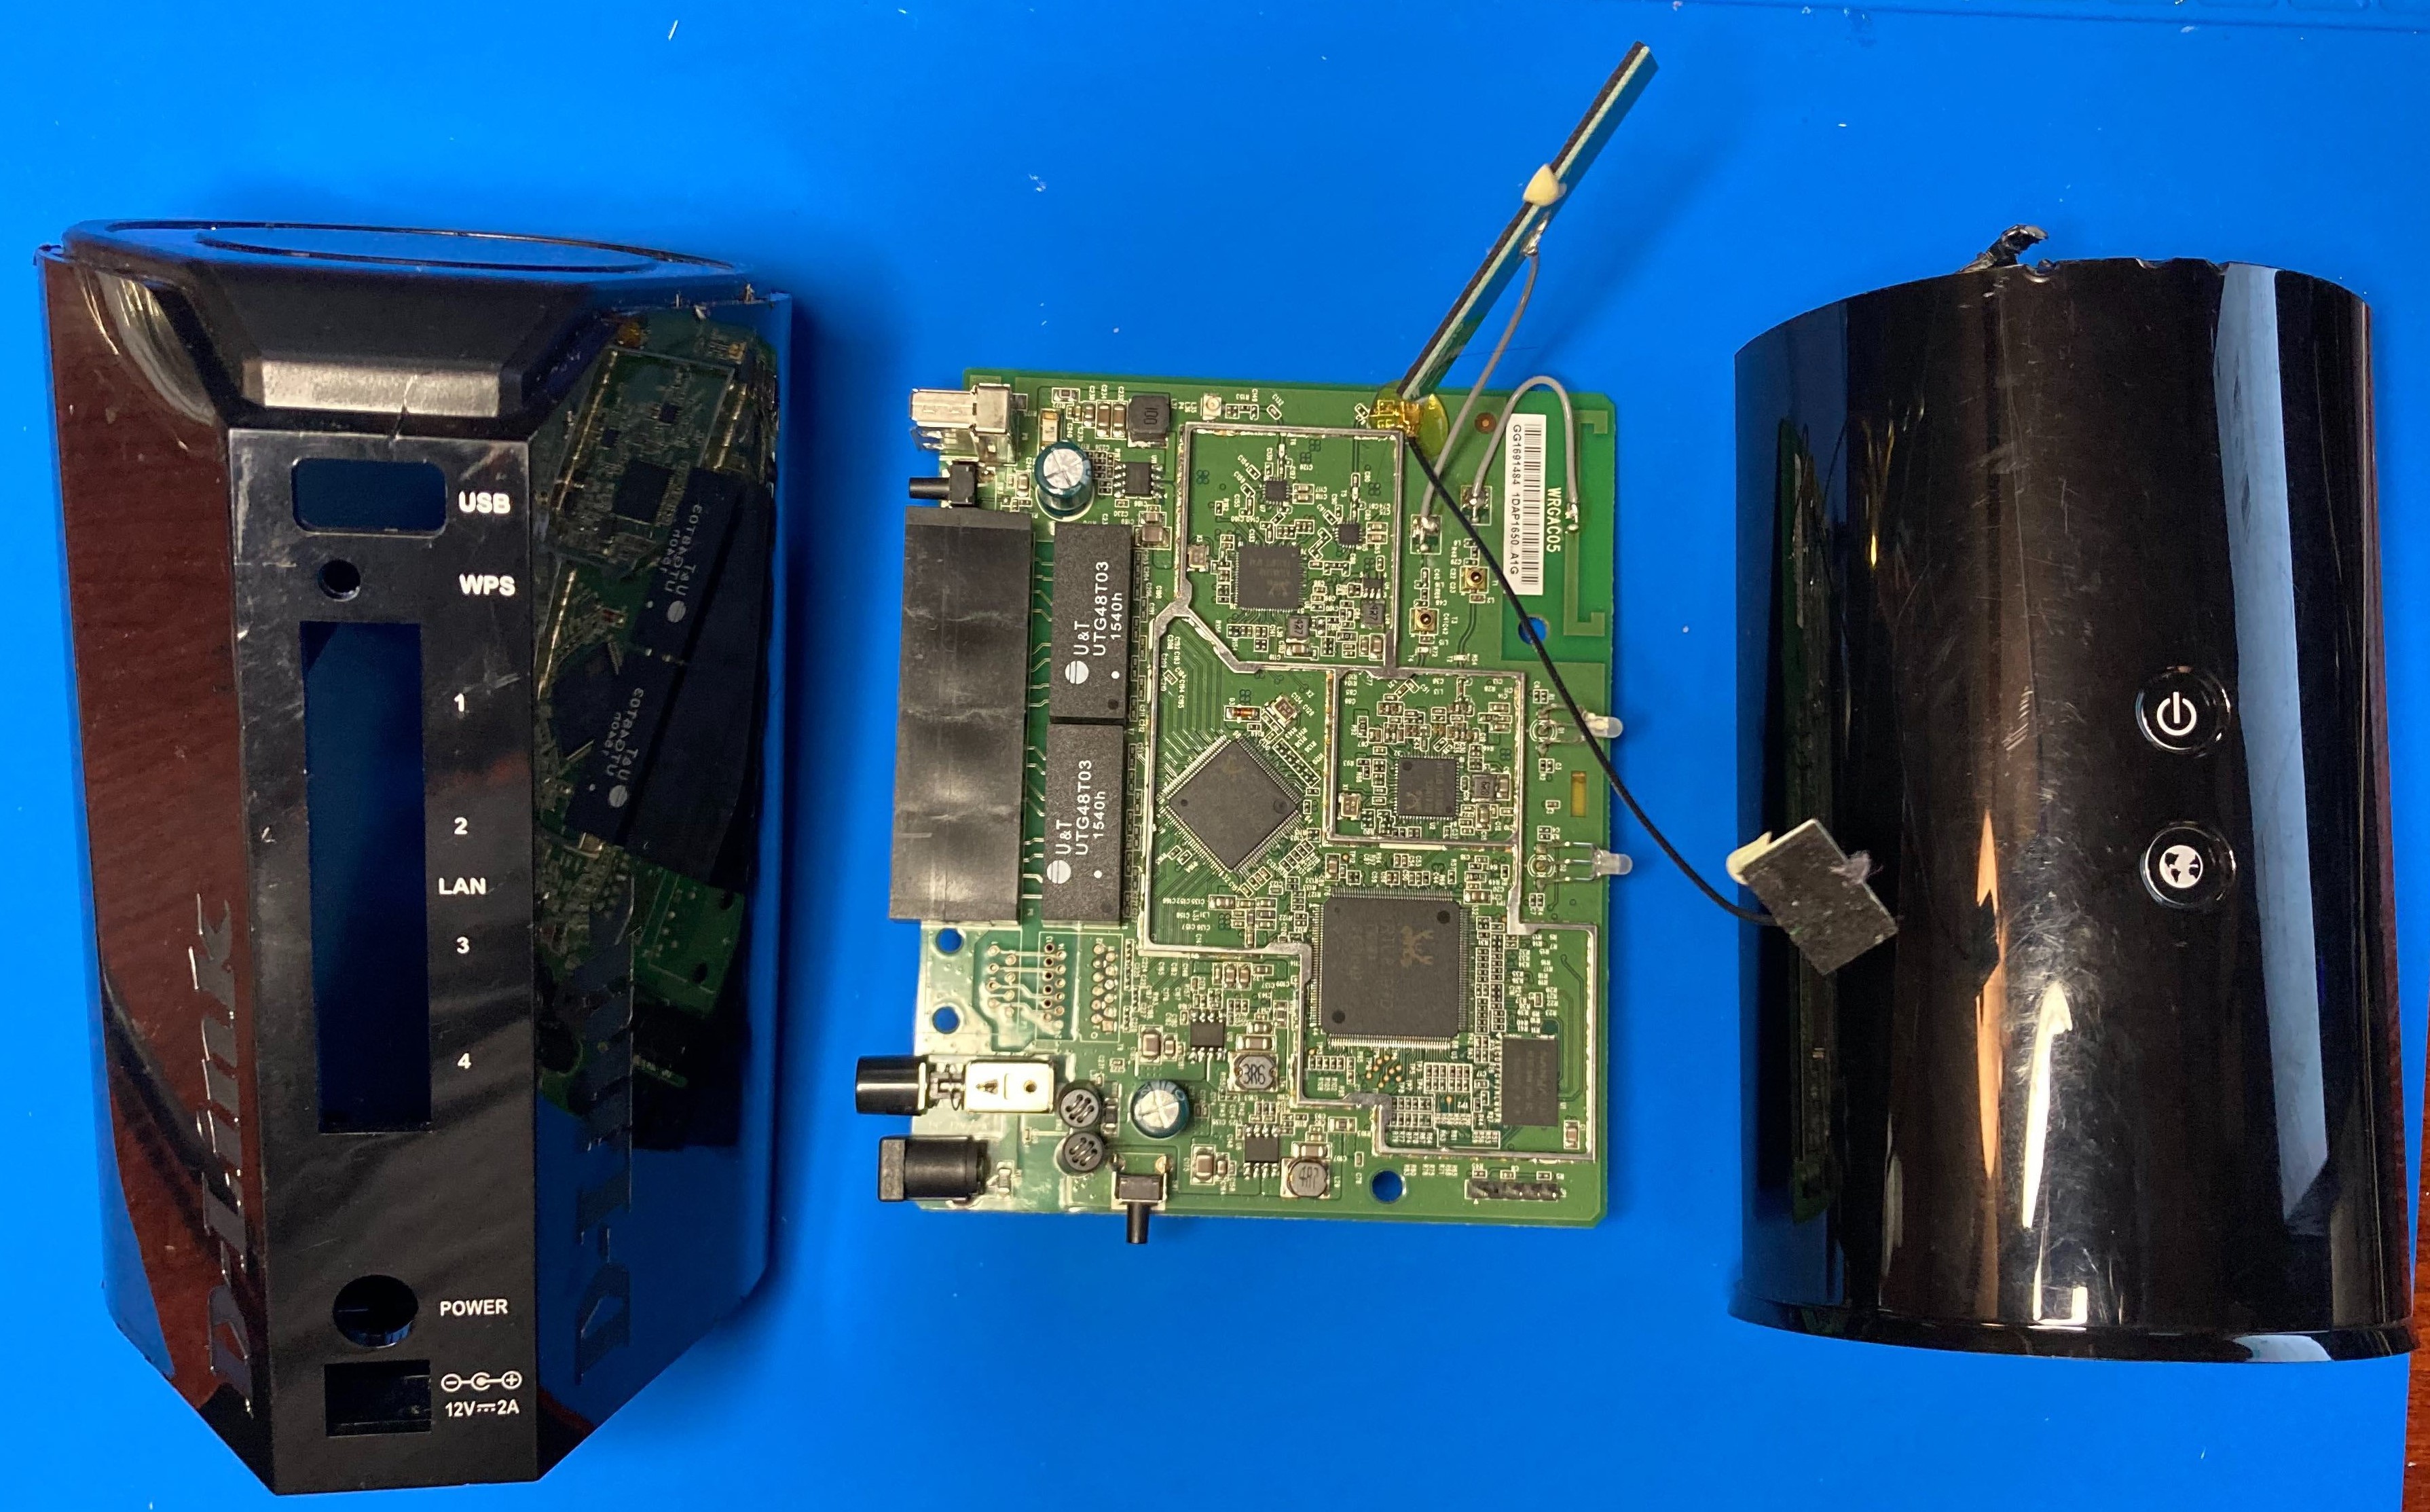
Previously, we demonstrated how to use glitching to access a bootloader shell of the D-Link router. We did this by shorting the data pin of the flash memory chip to ground during boot.
As before, we will open a serial console to get information about the system and use that information to get an idea of when to do a glitch attack – since the timing of this attack is critical.
Using a UART-to-USB converter, we can connect to the device’s serial console and see the following logs at boot.
Booting...

@@@@@@@@@@@@@@@@@@@@@@@@@@@@@@@@@@@@@@@@@@@@@@@@@@@@@@@@@@@@@@@@@@@@@@@@@@@@@@@@
@
@ chip__no chip__id mfr___id dev___id cap___id size_sft dev_size chipSize
@ 0000000h 0c22018h 00000c2h 0000020h 0000018h 0000000h 0000018h 1000000h
@ blk_size blk__cnt sec_size sec__cnt pageSize page_cnt chip_clk chipName
@ 0010000h 0000100h 0001000h 0001000h 0000100h 0000010h 000002dh MX25L12805D
@
@@@@@@@@@@@@@@@@@@@@@@@@@@@@@@@@@@@@@@@@@@@@@@@@@@@@@@@@@@@@@@@@@@@@@@@@@@@@@@@@

---RealTek(RTL8196D)at 2013.07.05-14:42+0800 v0.5 [16bit]
(659MHz)
SVN:884 signature=wapac04_dlob_dap1650
Verifying Checksum ...

Checksum PASS.
CHECK FLASH IMAGE: SEAMA header was found!!
Read Addr =0x80500000! srcAddr=0x00050050 len =0x0016d000

Jump to image start=0x80500000...
decompressing kernel:
Uncompressing Linux... done, booting the kernel.
done decompressing kernel.
Usually, the boot logs indicate when the CPU is reading from memory. Here we also see when the device is performing a checksum on flash memory contents. This is great time to glitch to see the results.
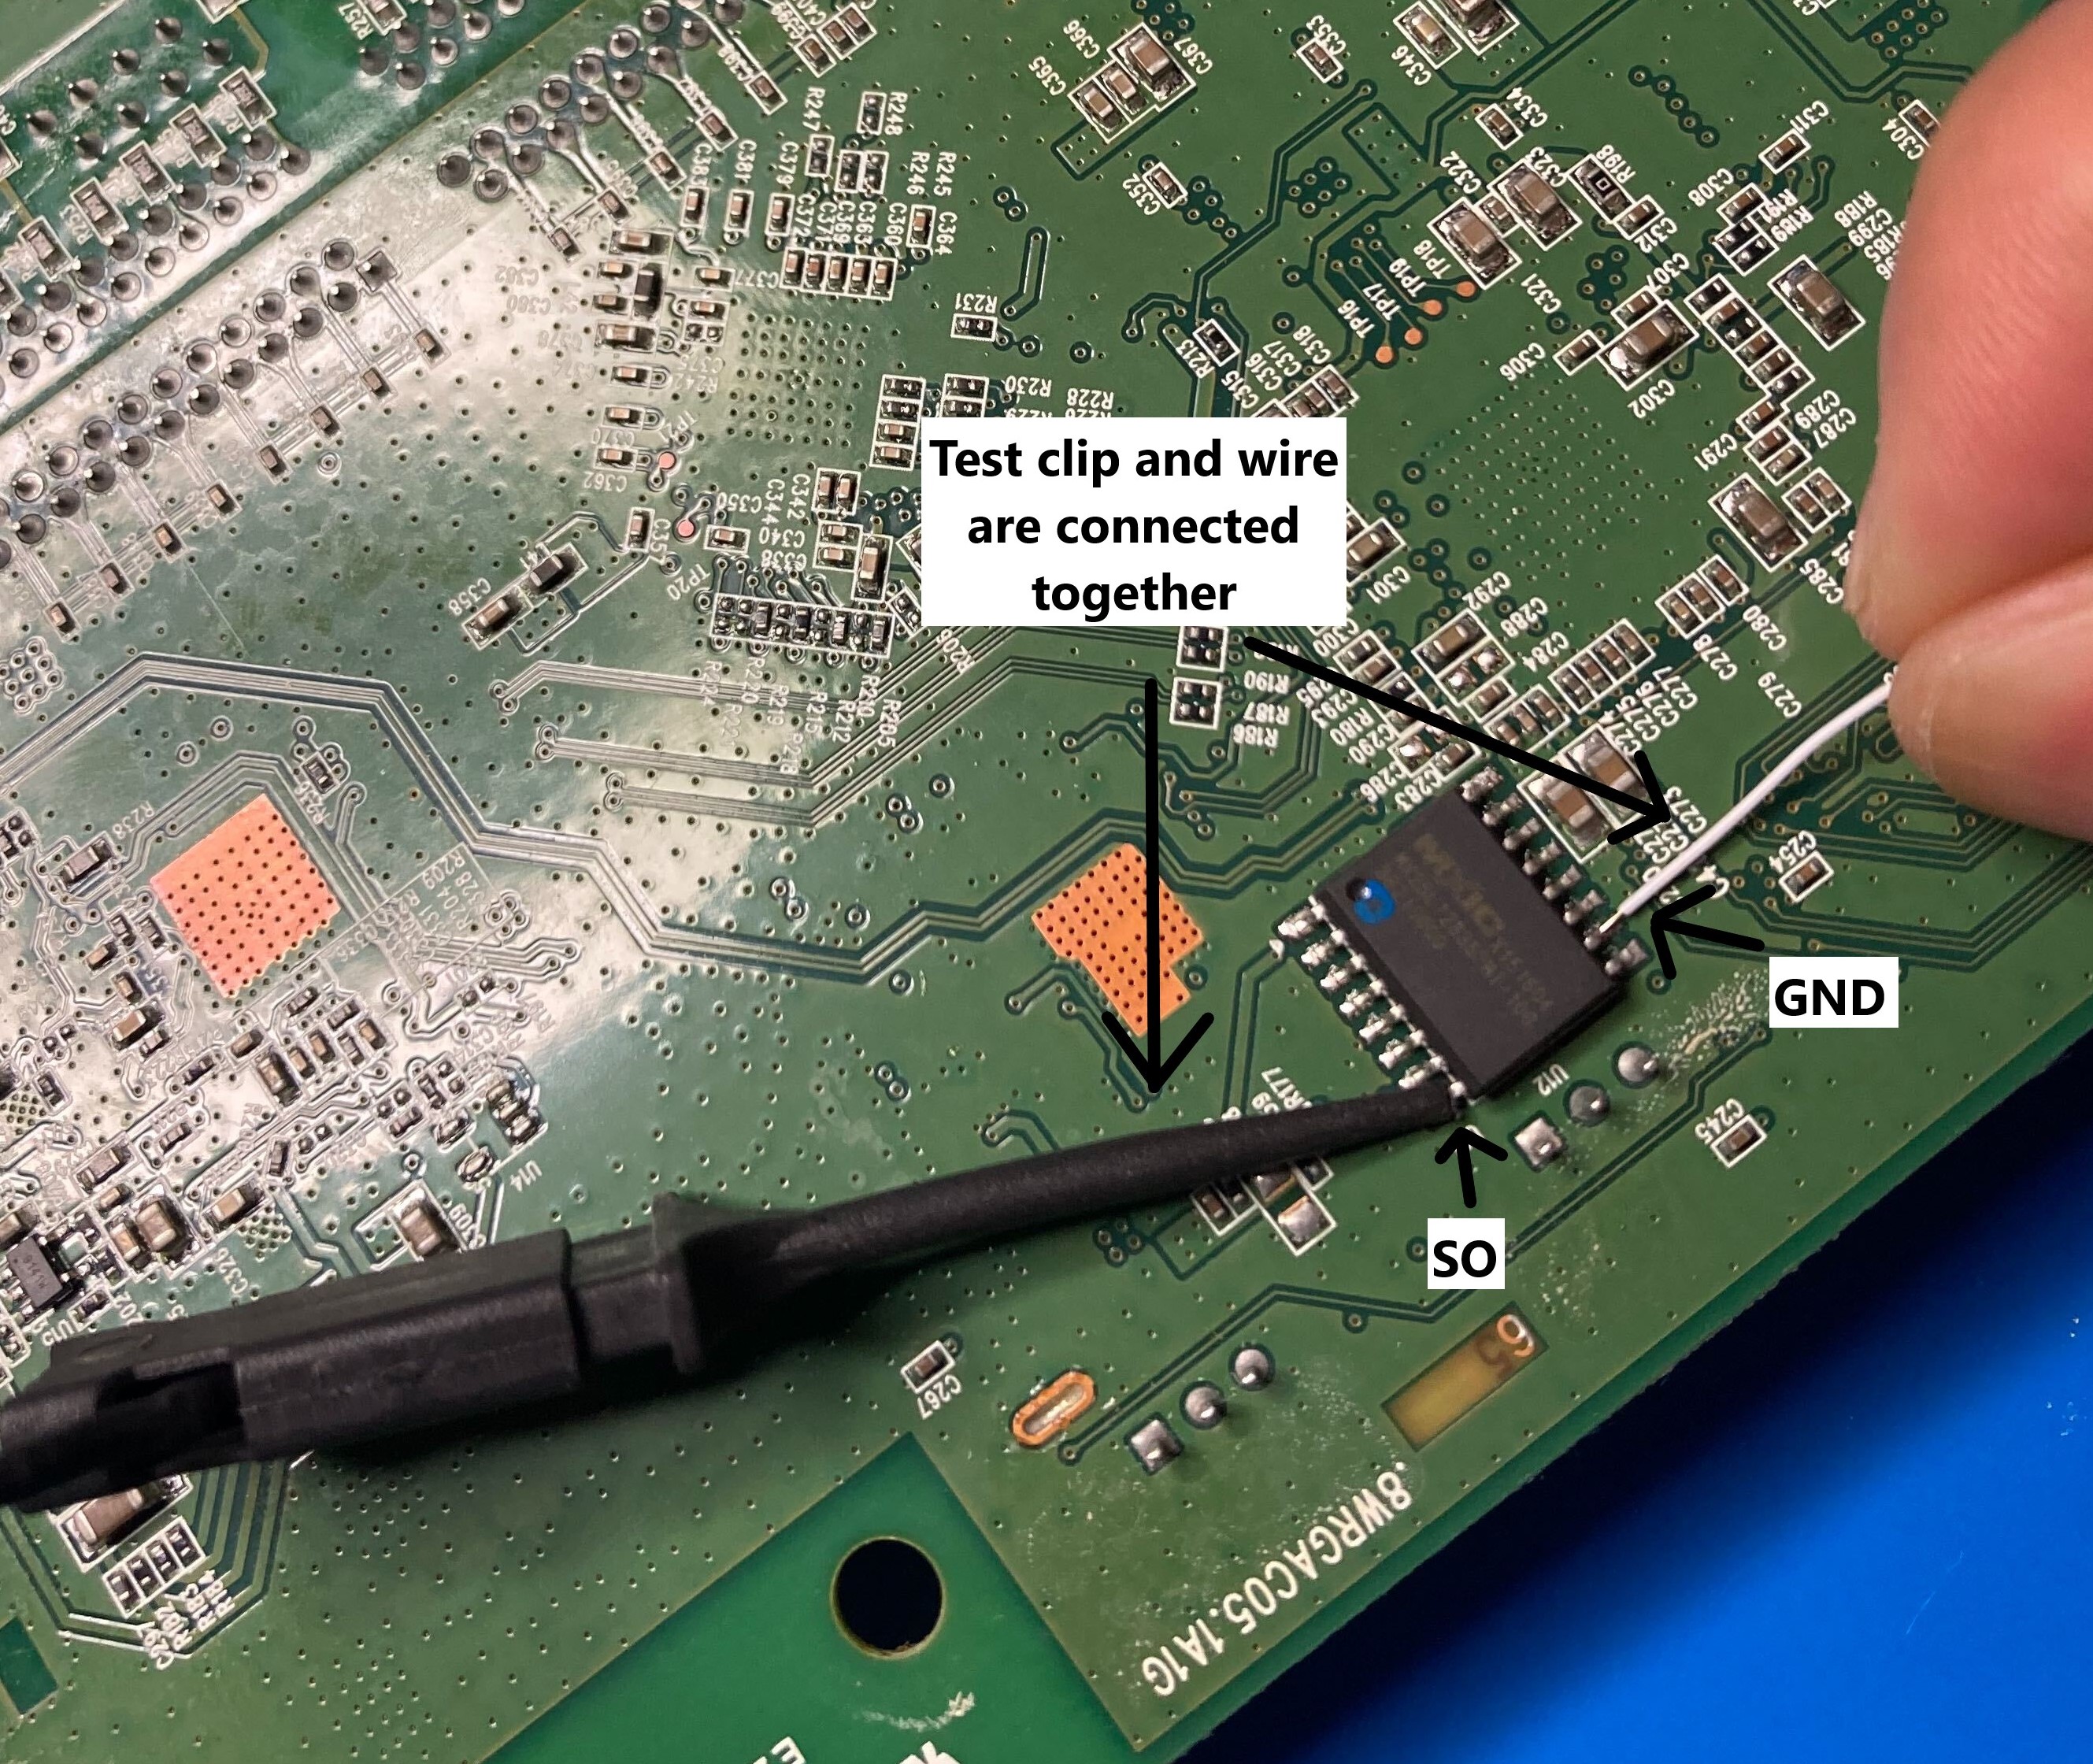
If we time it correctly, we can short the data pin of the flash chip to ground when we see the “Verifying Checksum …” line appear. Here is a real time example of what happens when we do this – and the console we can access when we glitch at this time.
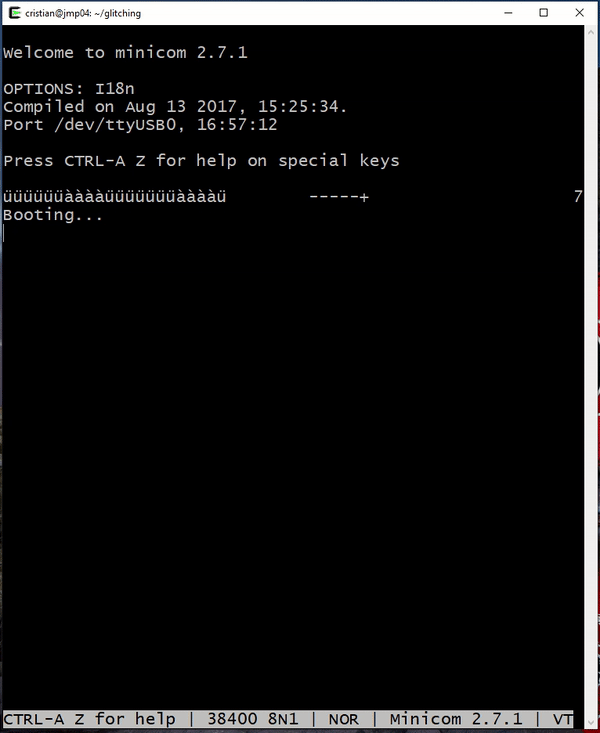
The device opens in a bootloader shell for the RealTek CPU. Due to the successful glitching attack, we now have access to a wide range of privileged commands.
<RealTek>?
----------------- COMMAND MODE HELP ------------------
HELP (?)                                    : Print this
help message
DB <Address> <Len>
DW <Address> <Len>
EB <Address> <Value1> <Value2>...
EW <Address> <Value1> <Value2>...
CMP: CMP <dst><src><length>
IPCONFIG:<TargetAddress>
AUTOBURN: 0/1
LOADADDR: <Load Address>
J: Jump to <TargetAddress>
SIG: SIG <type><sig>
SIGR: Display signature and flag
FLR: FLR <dst><src><length>
FLW <dst_ROM_offset><src_RAM_addr><length_Byte> <SPI cnt#
>: Write offset-data to SPI from RAM
MDIOR:  MDIOR <phyid> <reg>
MDIOW:  MDIOW <phyid> <reg> <data>
PHYR: PHYR <PHYID><reg>
PHYW: PHYW <PHYID><reg><data>
PORT1: port 1 patch for FT2
D8 <Address>
E8 <Address> <Value>
Flash BASH
How Flash BASH Automates Glitching
Before we get into installing Flash BASH for your use, let us show you how it automates the glitching process demonstrated above.
Since we were fortunate enough to have access to a serial console on the target device, we will use the output from it to trigger the glitching. Here is a photo of this setup, with a Raspberry Pi and our Flash BASH Pi HAT connected to our target.
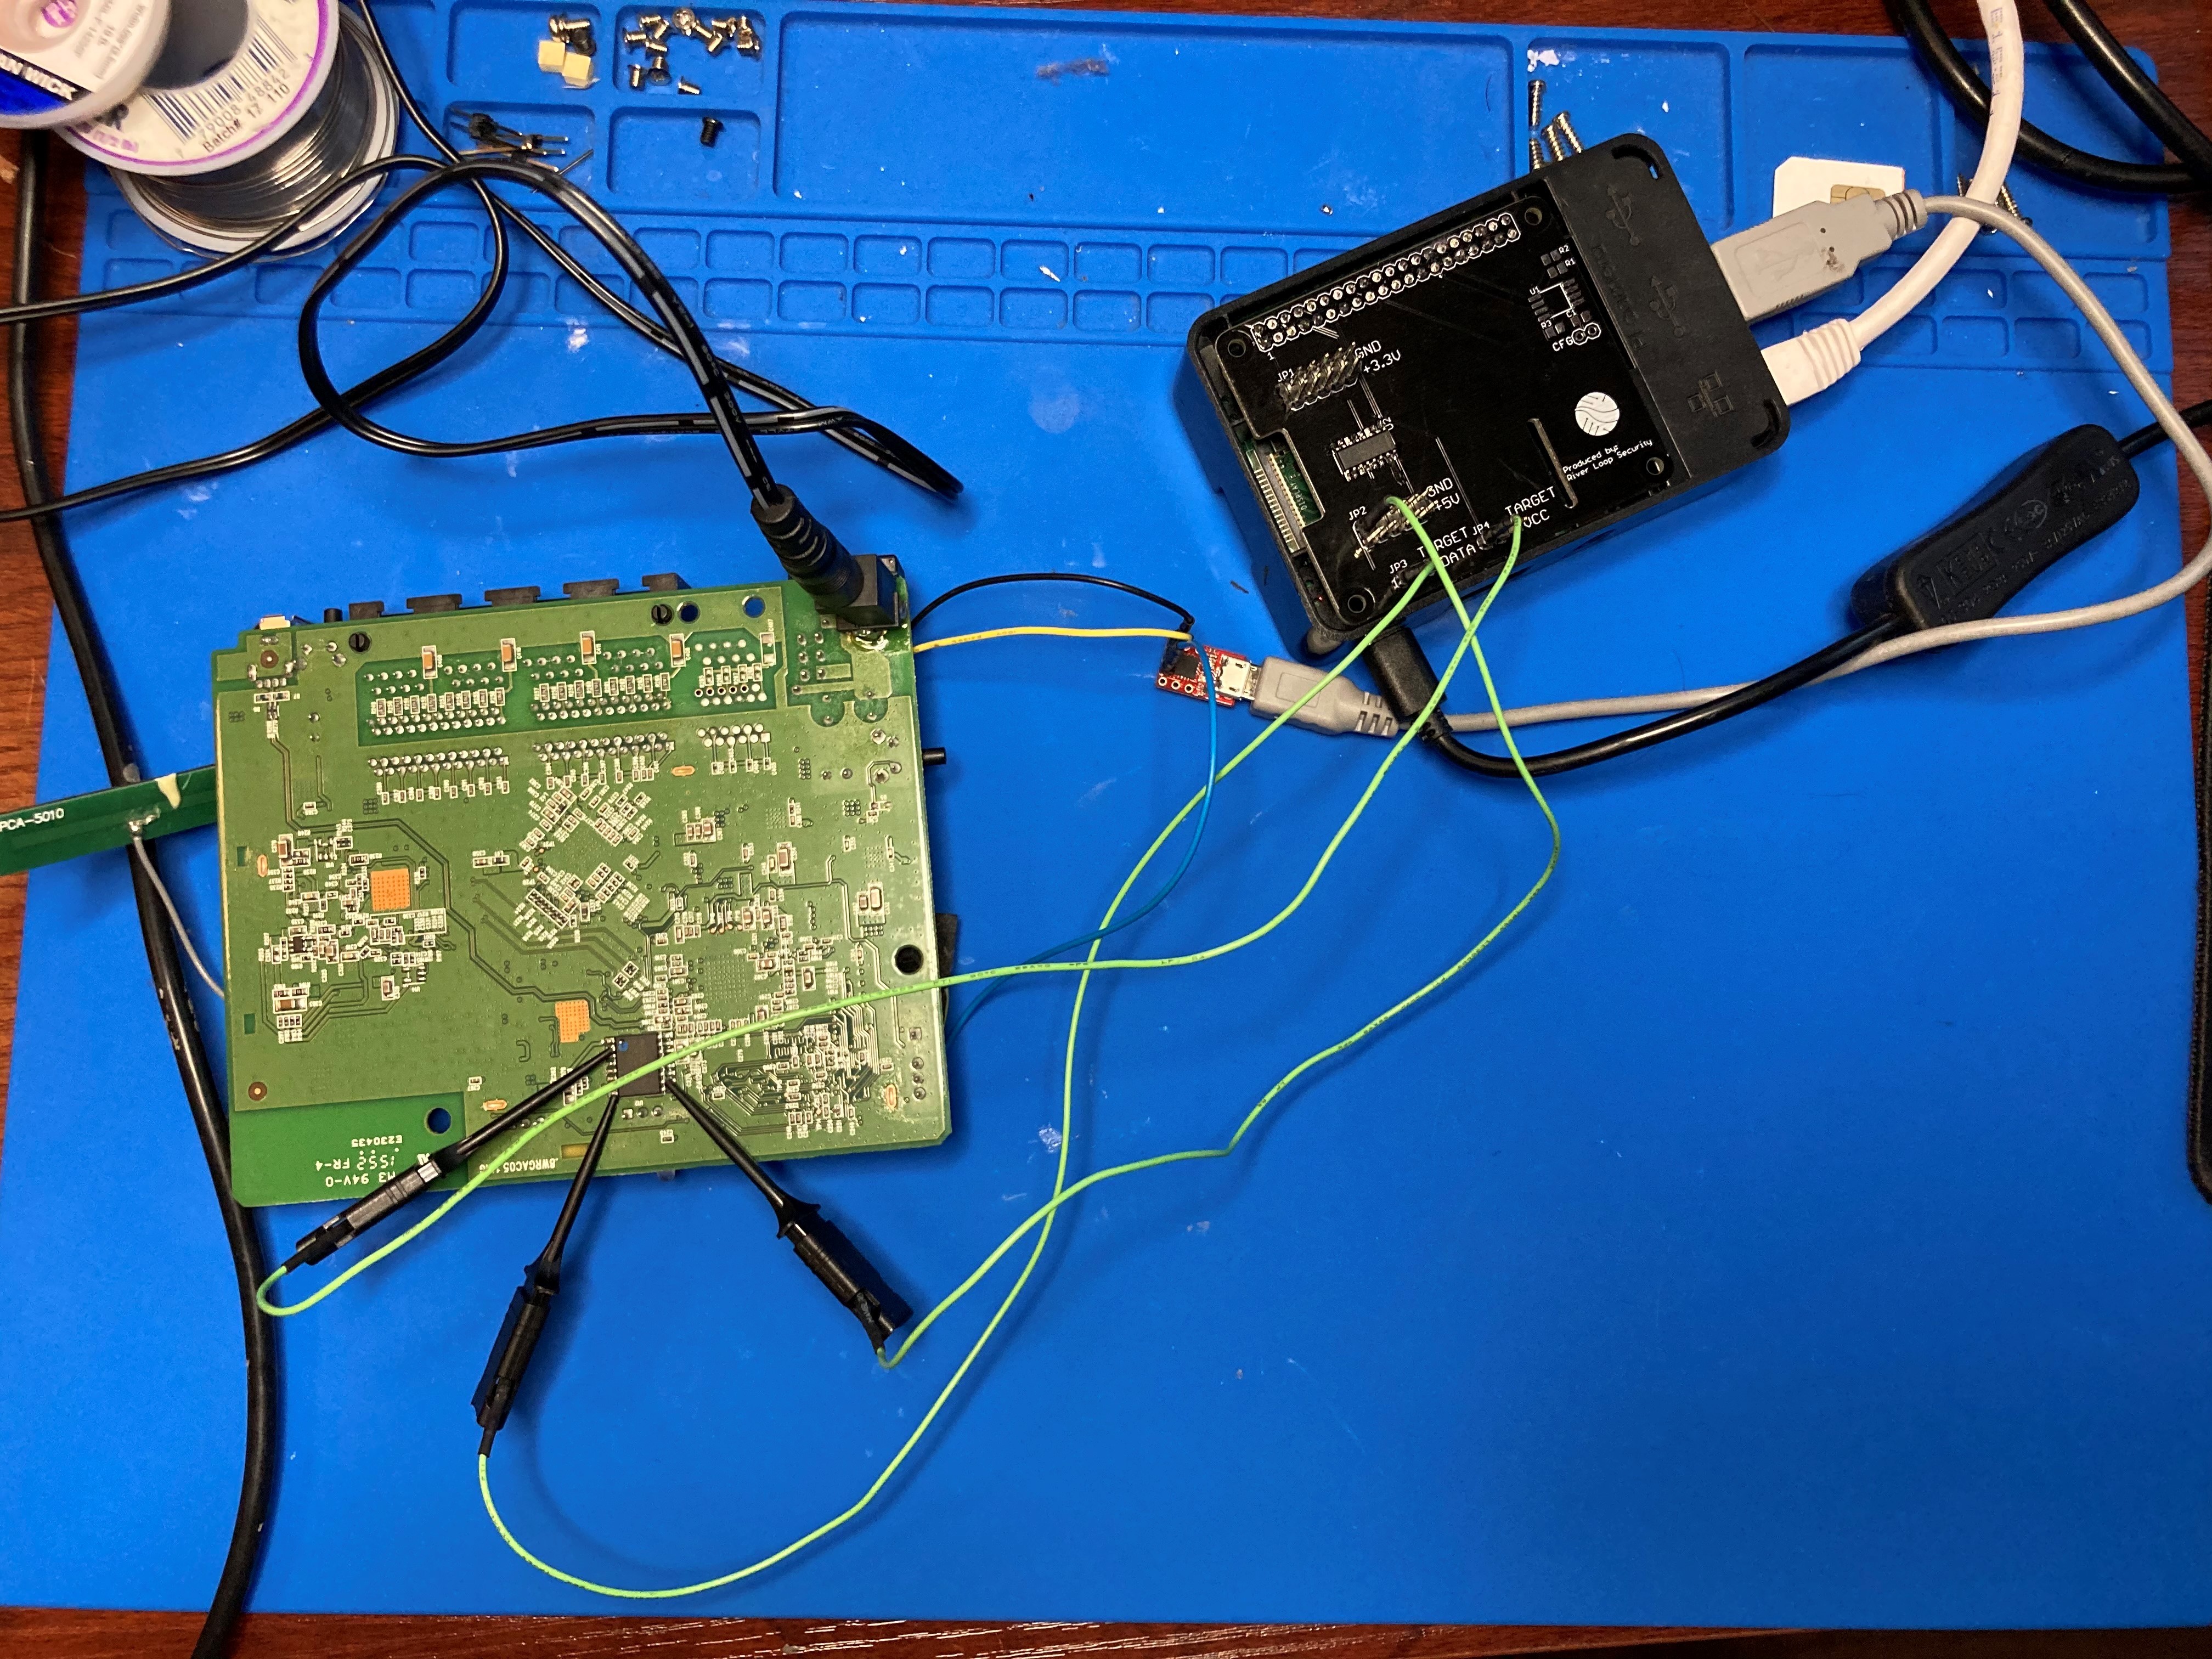
Hardware Setup
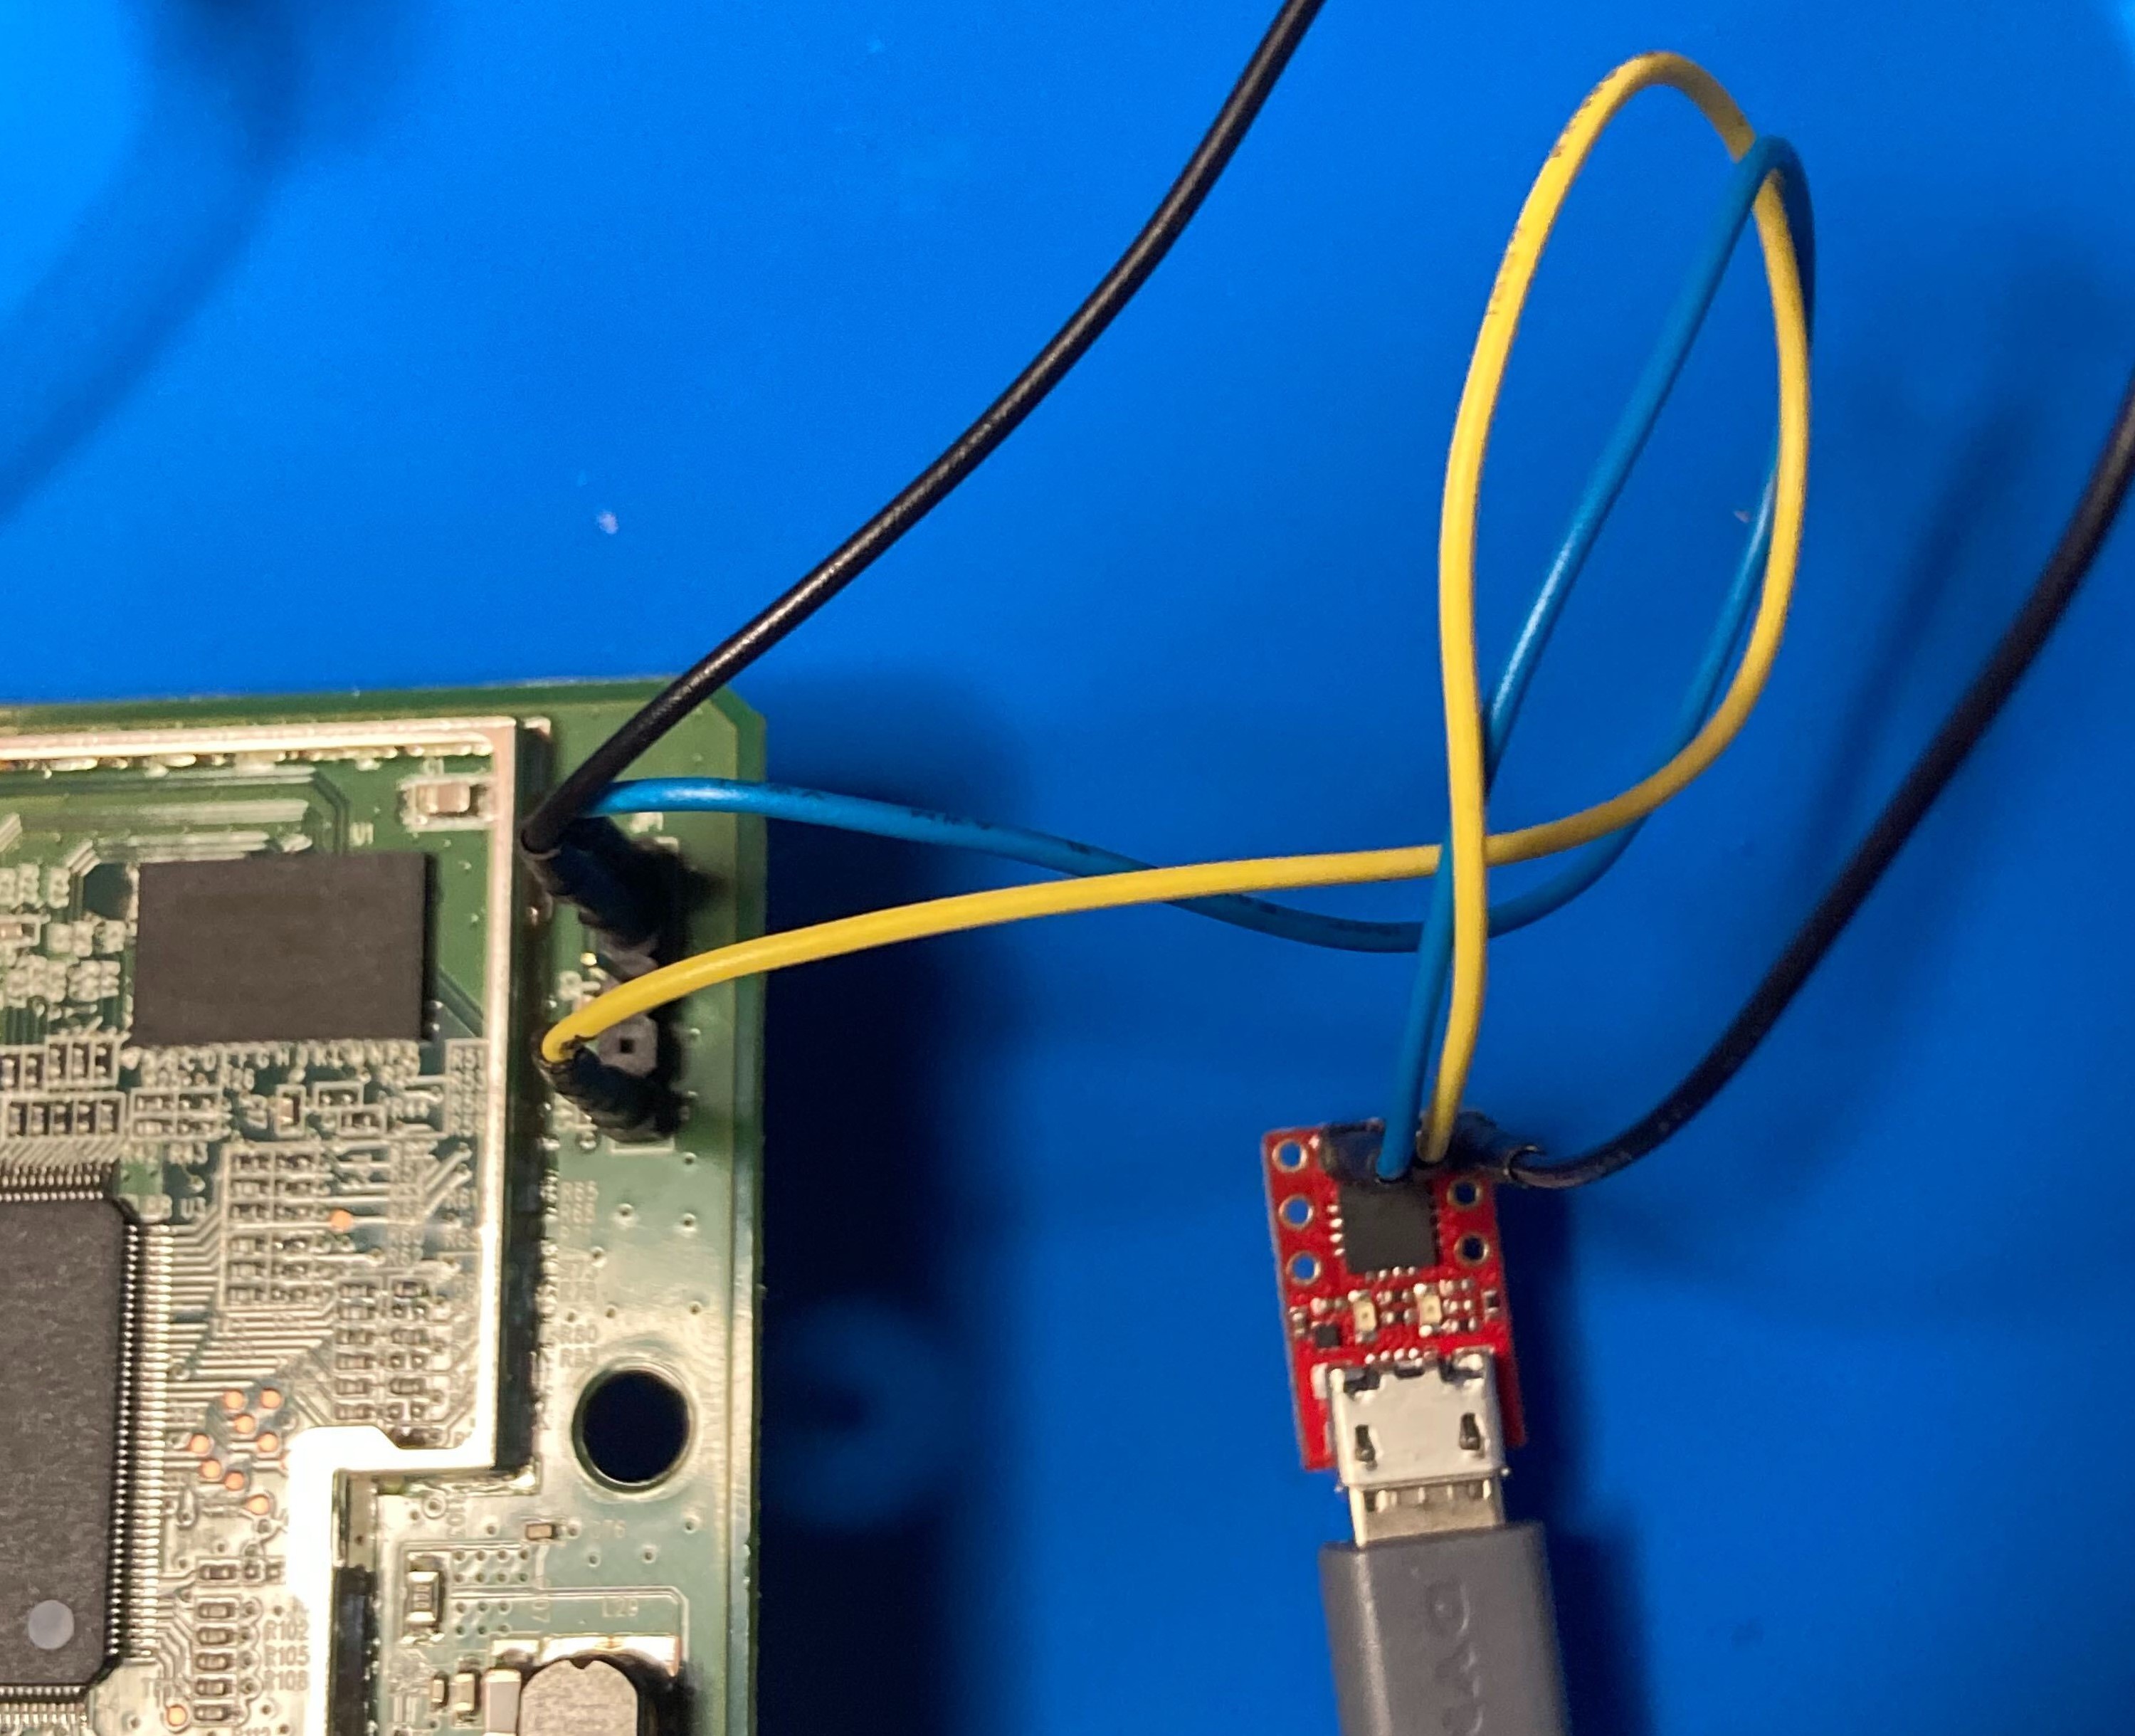
We first attach the FlashBASH Pi HAT to our Raspberry Pi which has a multiplexer on board and the necessary connections to allow us to interface the target device. Next, we connect the UART-to-USB converter to the Raspberry Pi and connect the UART pins to the serial UART Tx and Rx pins on the target. Lastly, we need to connect to the flash chip of the target. We do this by connecting pins from the headers on the Pi HAT to the serial I/O pins on the flash memory chip. We have headers for ground, Target VCC, and Target Data. We will explain this in more detail later but for now we take a quick look at the configuration for the program running on the Pi.
Software Setup

In the configuration state, we set up Flash BASH to do a SERIAL type of attack. We then give it necessary parameters for a serial connection such as the baud rate and device descriptor for the serial device. Using the serial console to our advantage, we will use the serial output to trigger the glitching attack. The first trigger will start grounding the data pin and the second trigger will release the data pin from ground. Now let’s see it in action!
Results

After setting up Flash BASH, we turn on the device. Flash BASH then reads the serial output from the target and passes it through a buffer which is then compared to the trigger phrases specified in setup. The buffer is printed on screen for debugging purposes and just to make sure the program is running. We get two statements from Flash BASH indicating “GLITCHING INITIATED” and “GLITCHED” when both triggers are seen.
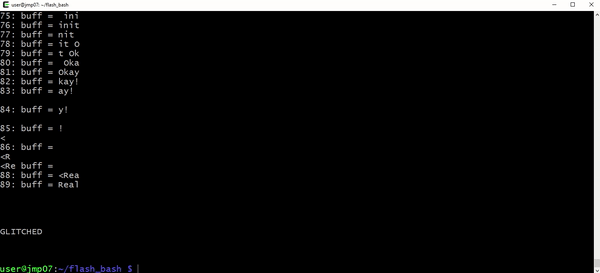
Flash BASH exits and then we open a serial console using minicom. As you see above, we successfully accessed the bootloader shell automatically using Flash BASH by taking advantage of the target’s boot vulnerability.
How to download and install Flash BASH
Please visit our public GitHub that has the source code which makes it easy for you to install this onto your Raspberry Pi. The key component to this is the multiplexer. The multiplexer makes it possible to ground the data pin on command using the Raspberry Pi. Without it, the Raspberry Pi wouldn’t be able to bridge the two connections.

Running Flash BASH
After running the Make file you should be good to go. Just navigate to the top-level directory and run the following command:
sudo ./flash_bash
Then you will be prompted to choose an attack type.
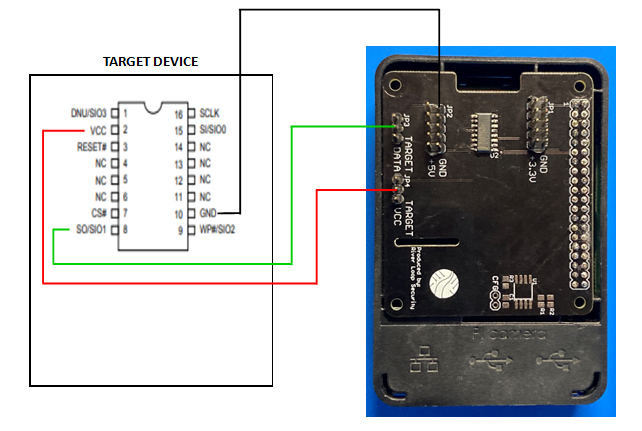
Serial Attacks
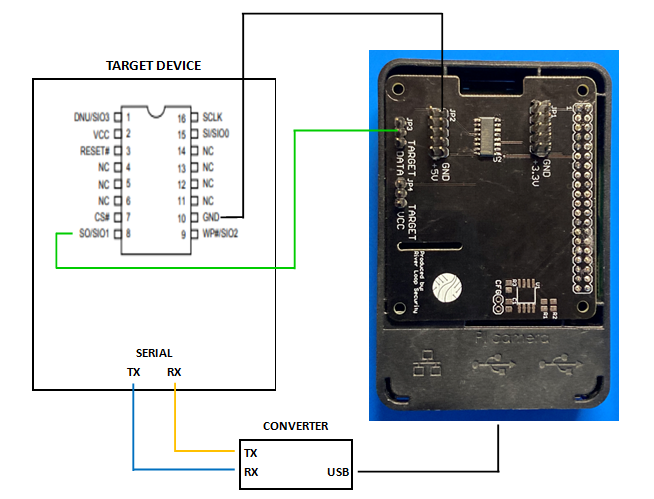
The serial attack is what was shown in the example and the easiest to set up and automate. This attack type takes in serial output from the target device and uses that to trigger the glitch. As you saw above, this will require a UART-to-USB converter (or you can use the built in UART pins of your Pi), and the parameters for a serial connection. Follow the set up and you should have it configured and ready to glitch. Here is a connection diagram for this setup.
Timed Attacks
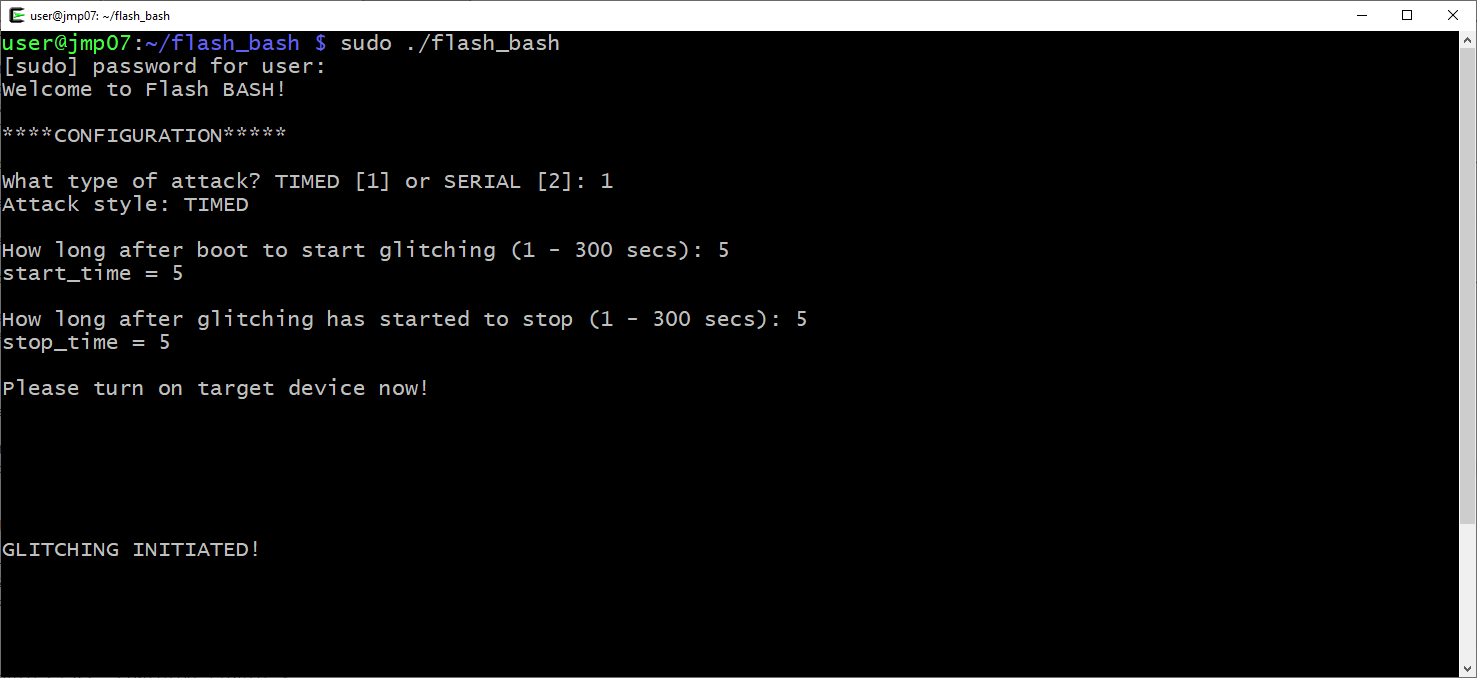
The timed attack is another feature we added just in case you don’t have a serial console from the target device. To set this up, you would need to connect the target’s VCC to the Pi hat’s Target VCC header so that you can trigger glitching when the device boots up. There are two parameters for this type of attack. “Start_time” and “Stop_time.”
“Start_time” is the time it takes from boot to the vulnerable state. In the example of the D-Link router, it was the time between boot and the “Checksum” line.
“Stop_time” is the length of time you want to glitch the target.
This “timed” attack type allows you to use various time measures to see the result. For example, you can attempt glitching at boot seconds: 1, 2, 3, 4, 5, and other timing intervals.
Here is a connection diagram for this setup.
Thank You
We hope you check out the repository and give us your feedback. Contact us at any time to discuss other hardware security questions.